THE POOR MAN’S GUIDE TO CREATING HUDGUNS
This guide goes over how to create a simple hudgun for Sauerbraten.

I. Whatchu’ Need
II. Building Your Mesh
III. Mesh Revision
IV. Texturing
V. Export
I. Whatchu Need
For this simple guide we’ll be using Sauerbraten, Blender and Noesis (unless your Blender/3D Modeler supports MD5). Easiest step.
II. Building Your Mesh
Now you’ll need your imagination, or an idea.
1a. Build your model in sections in Sauerbraten to later be arranged in your 3D Modeler.
1b. Build your entire model in Sauerbraten.
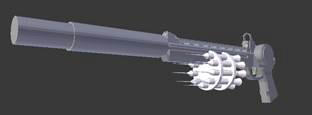
Here is an example from one of my older projects.
2. Delete the floor beneath your model (I like to replace it with a clip volume)
3. Save your work and use command /writeobj. This command will export the entire map as an obj format. On Windows 7 it will be saved under C:\Users\[username]\Documents\My Games\Sauerbraten
III. Mesh Revision
Now open up your obj file into your 3D Modeler and make any revisions you wish. This is where you’ll arrange your mesh pieces if you chose step 1a in the previous section. I generally replace cylinders with Modeler-generated ones as Sauer can’t make good cylinders.
Here is an example from an older project. Note that it is positioned for a direct Sauer port.
IV. Texturing
This is the hardest part and I completely suck at it. See Blender or your 3D Modelers’ tutorials for this part. Just note that if you do not unwrap your mesh, your skin will be stamped throughout the model.
V. Export
This step is only necessary if your 3D Modeler does not support MD5. MD5 Exporter for Blender 2.6+
1. Save your model and export it to obj. (Ignore if MD5 Compatible)
2. Open up Noesis and Export the model from Obj to MD5Mesh. (Ignore if MD5 Compatible)
3. Open up the folder of the weapon you wish to replace, on Windows 7 it will be under C:\Program Files (x86)\Sauerbraten\packages\models\hudguns
4. Replace the MD5Mesh file, texture files, and delete all DLL files. If you don’t want to write up a cfg file, you’ll have to keep the same filenames, but you’ll have to position your model for direct port so it lines up with the arms.
Here is an example CFG from one of my older projcts.
5. Test your creation! If it doesn’t look quite right, keep trying. It took me a while just to get my first one down, and it’s still not perfect.
/endtutorial
